Getting started with Mid-Hudson TV on Roku

This guide will show you how to set up Roku for the first time. The steps work on all Roku devices including the Roku Express, Roku Express 4K, Roku Streaming Stick+, Roku Streaming Stick 4K and Roku Streambar.
Prerequisites
- A Compatible TV: Ensure you have, at a minimum, an HDTV (720p or higher) equipped with an HDMI port to utilize Roku.
- Internet Connection: The Roku lacks its own internet connectivity. It is necessary to link your Roku to your Mid-Hudson Cable WiFi connection.
- Roku Account: Last but not least, you’ll need a Roku account to register your Roku. Roku accounts are free and no credit card is required. Register for one at roku.com.
Part 1: Getting Started
- Connect your Roku player using the correct HDMI cable, or connect your Streaming Stick directly to an open HDMI port on your TV.
- Use the power adaptor (or USB power cable and power adaptor) to connect your Roku streaming device to a wall outlet.
- Use your TV remote to power on your television and select the input where you connected your Roku device. You should see the Roku logo on the TV screen as your Roku device powers on.
- Insert the batteries provided into the Roku remote and follow the on-screen instructions to pair your remote.
- During setup, you will choose a language and connect to the internet.
- Choose your wireless network from the list of available networks and enter your password. This is often the same network you use to connect your computer or smartphone to the internet. If you do not see your network, select Scan again to see all networks.
- Once connected to the internet, your streaming device will check to see if there is a software update available, download the latest version if necessary, and automatically reboot after updating.
- Select Set display type and let your streaming device auto detect the best display resolution so you do not have to manually configure the settings. To change the display type at a later time, go to Settings > Display type.
- Select Check remote settings to automatically set up your Roku voice remote to control the power and volume for your TV. If you skip this step, you can set up your remote for TV control at any time from the Settings menu. Simply go to Settings > Remotes & devices > Remotes > [select your remote] > Set up remote for TV control. A Roku voice remote may not be able to control volume and power on all TV models. With some TV models, you may only be able to control the volume, and not the power.
- When prompted on screen, you will need to perform the following steps to create your Roku account and complete device activation. It may take a few moments to receive the activation email from Roku. If you do not see it in your email inbox, be sure to check your spam (or junk) folder.
- With all steps complete, your Roku streaming device is ready to use. Once at the Roku home screen please proceed to Part 2.
Part 2: Install the Mid-Hudson TV, My Stream App
Press Home  on your Roku remote
Scroll and select Streaming Channels to open the Channel Store

Enter “Mid Hudson TV” in Search Channels to find the Mid-Hudson My Stream Channel.
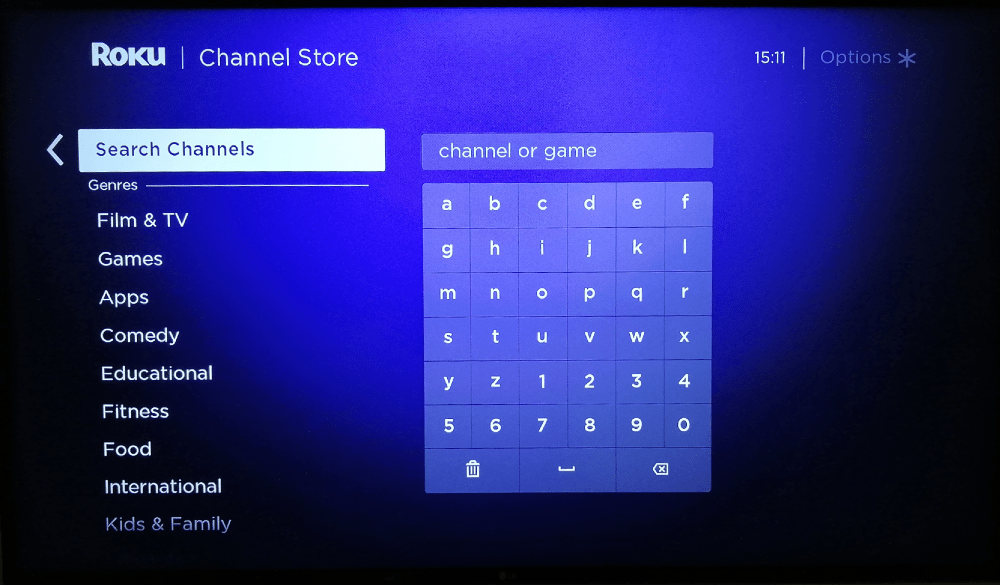
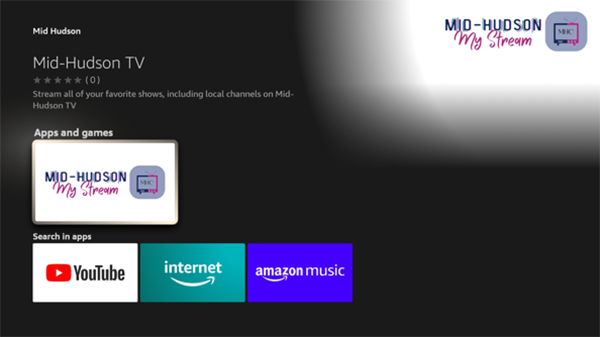
Select and download the channel.
If you are installing a channel to your Roku device, it will be added to the list of channels under Home on the main screen. Scroll down, it will have been added to the bottom of the list of channels. If you prefer, the channel can be moved higher in the list.
Launch the Mid-Hudson TV App and at the login screen please use the Name and Password provided when you signed up.

For Device Name please use something similar to Livingroom RokuTV, defining the location of your device. This way if you have more than one in your home or business, we can identify it for support purposes.
